Sunday, June 10, 2012

N64 Backpack

Another oldie that I've only just got round to posting, after I made my second Megadrive backpack I decided to switch sides for the next one.
As usual for these, most of the time was spent in clearing out the insides with the good old Dremel, before adding steel hinges and latches and attaching straps I cut off a cheapo schoolbag.

 The console hangs on your back with the logo at the top

The four controller ports didn't leave room for the latches, so I put them on the sides

You can see into the compartment from the top

 The inside of the backpack is lined with fake fur and gold satin on the sides

Cardboard supports keep the side panels steady when the pack is closed

Playstation Briefcase

I put this one together a few years back, but never got around to documenting it.
I got hold of a junked Playstation console from work and removed all the internal plastic mouldings with a Dremel.
Once the inside was opened out, I glued the buttons and drive lid in place and added metal hinges and a carrying handle.

 The handle is designed for a kitchen drawer

Magnetic door catches hold the case closed when carrying

The interior is black vinyl, secured at the top with velcro

My Wooden Laptop

When I upgraded from my old Acer to a new Toshiba laptop, I thought I'd have a go at doing something crafty with it.
I had to replace the failing hard drive, so I put in a 64Gb solid-state drive and installed the Windows 8 Preview operating system.  The laptop was now working again, much faster than before, but the battery had stopped charging, making it useless as a portable PC.
I decided that, with no need to make it small and light, I'd make it big and heavy instead.

From the top, it looks a bit like an old family album

 Or a very large music box

 Open it up and it's something else entirely

 
A small door on the side lets the DVD tray open

A series of slots cut in the bottom allow for cooling

Sunday, March 25, 2012

Replacing Daelim S1 Regulator Rectifier

A few weeks ago, the battery in my scooter went flat for the second time in six months.  I was able to recharge it with a plug-in charger, so I figured there had to be something preventing the battery from charging.
Some research on the Scooter Community forums indicated that the regulator rectifier often fails on this model, leading to progressive loss of charging as well as unreliable starting.

Daelim S1 charging system
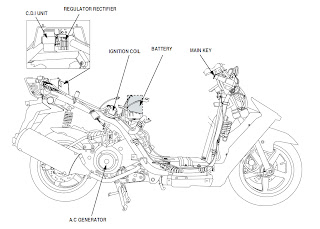
Daelim S1 Charging System
 The Daelim service manual shows how to remove and test the regulator, so I pulled it out and found that the resistances were all wrong.  Voltage was leaking through and discharging the battery, so I ordered a new regulator from the dealer.

Daelim regulator rectifiers
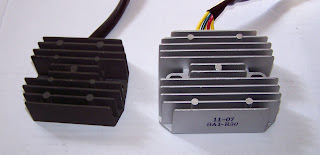
Standard regulator (left) and upgraded one (right)
The new regulator is much bigger than the old one, with a heavier heatsink.  This should make the new one less likely to overheat.

Standard bolt (left) and new one (right)
 To fit the bigger heatsink, the standard bolts need to be replaced with longer ones.  The new bolts are metric 6 x 25mm hex-head bolts, zinc plated.

Daelim S1 upgraded regulator rectifier
The regulator mounts to the same location, with the bolts attached to threads on the scooter frame.  Besides the longer bolts, nothing needs to be moved or modified.

The wires pass behind the frame and connect to these two plugs on the right-hand side of the scooter.

Since replacing the regulator, the battery is keeping its charge and I can rely on getting started in the morning.  As long as you have a decent tool kit and refer to the service manual, this should be an easy home repair.